Kubernetes In-Tree Scheduler Plugins: A Complete Reference
This is part of a series of blog posts exploring the Kubernetes kube-scheduler. See also Your Guide to Extend Kubernetes Scheduler.
Introduction
The Kubernetes scheduler comes with 19 built-in plugins that handle everything from resource constraints to affinity rules. Understanding what each plugin does, when it runs, and how to configure it is essential for optimizing your cluster’s scheduling behavior.
In my previous blog, scheduler framework deep dive, I covered the architecture and extension points. In this post, I’ll provide a complete reference for all in-tree plugins, explaining:
What each plugin does
Which extension points does it implement
How it works internally
Configuration options you can customize (included with each plugin)
Real-world use cases
Understanding these in-tree plugins is crucial for effectively utilizing and extending your scheduler through configuration, as discussed in Method 1 of the extension guide. You can’t tune what you don’t understand.
The scheduler doesn’t pick just one plugin per extension point. Multiple plugins execute together at the same extension point (i.e., TaintToleration.Score, NodeAffinity.Score, and NodeResourcesFit.Score all run during the Score phase). Their results are combined to make the final scheduling decision. See the “How Multiple Plugins Execute Together” section below for details.
Extension Points Summary Table
Here’s a comprehensive overview of which extension points each in-tree plugin implements:
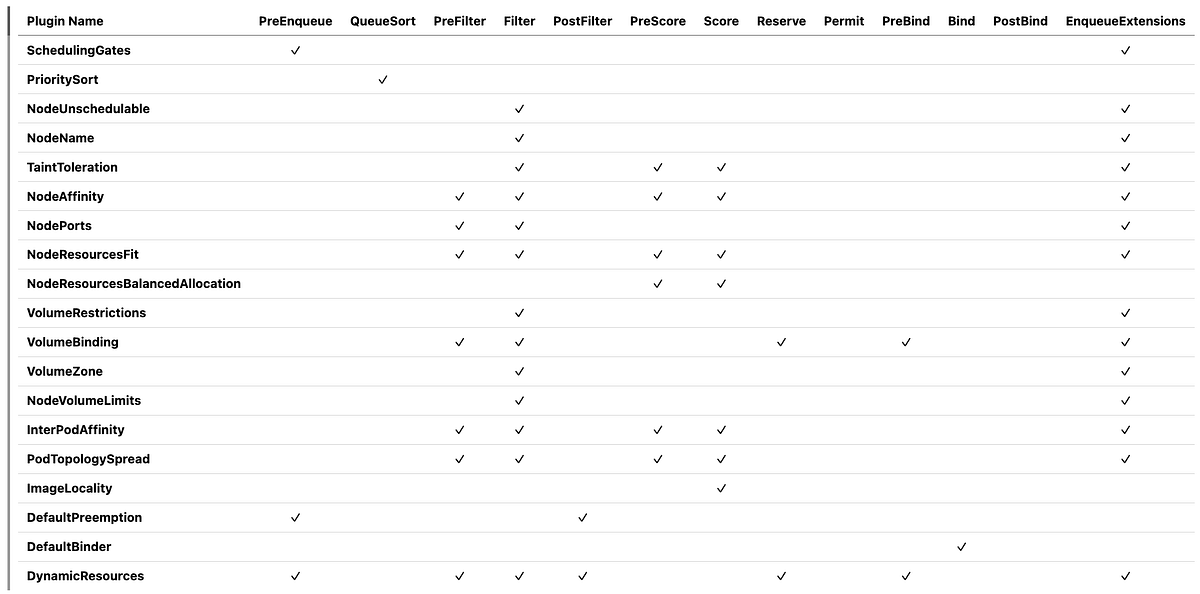
Multiple plugins executing at the same extension point is a critical concept to understand. In the table above, notice that many plugins implement the same extension points. This multi-plugin execution model allows the scheduler to consider multiple constraints and preferences simultaneously, making holistic scheduling decisions rather than optimizing for a single dimension. This means:
Filter Phase Example
When filtering nodes for a pod, ALL filter plugins run for each node:
NodeUnschedulable.Filter() checks if the node is schedulable
NodeName.Filter() checks if the pod specifies this node
TaintToleration.Filter() checks taints and tolerations
NodeAffinity.Filter() checks node affinity rules
NodeResourcesFit.Filter() checks resource availability
… and so on
A node must pass ALL filter plugins to be considered feasible. If ANY plugin returns “Unschedulable”, the node is eliminated.
Score Phase Example
For nodes that pass filtering, ALL score plugins run and their scores are combined:
NodeResourcesFit.Score(node-1) = 75 (weight: 1)
NodeAffinity.Score(node-1) = 80 (weight: 2)
TaintToleration.Score(node-1) = 100 (weight: 3)
InterPodAffinity.Score(node-1) = 90 (weight: 2)
PodTopologySpread.Score(node-1) = 85 (weight: 2)
NodeResourcesBalancedAllocation.Score() = 70 (weight: 1)
ImageLocality.Score(node-1) = 60 (weight: 1)

Final Score = (75×1) + (80×2) + (100×3) + (90×2) + (85×2) + (70×1) + (60×1)
            = 75 + 160 + 300 + 180 + 170 + 70 + 60
            = 1015
The scheduler picks the node with the highest weighted score.
PreFilter Phase
Multiple PreFilter plugins run sequentially, each computing and storing state in CycleState:
NodePorts.PreFilter() identifies host port requirements → stores in CycleState
NodeResourcesFit.PreFilter() calculates total resource requests → stores in CycleState
NodeAffinity.PreFilter() validates node selector and affinity rules → stores in CycleState
VolumeBinding.PreFilter() checks PVC requirements → stores in CycleState
InterPodAffinity.PreFilter() computes affinity terms → stores in CycleState
PodTopologySpread.PreFilter() calculates spread constraints → stores in CycleState
DynamicResources.PreFilter() identifies ResourceClaim requirements → stores in CycleState
Later, during Filter/Score phases, each plugin reads its own precomputed state from CycleState instead of recalculating.
There is always an Exception —> QueueSort
Only ONE QueueSort plugin can be enabled at a time (typically PrioritySort), as it defines the global ordering of the scheduling queue.
The 19 In-Tree Plugins
The following sections detail each in-tree scheduler plugin.
1. SchedulingGates Plugin
Controls when pods can enter the scheduling queue based on scheduling gates.
Extension Points: PreEnqueue, EnqueueExtensions.
How it Works:
Checks if a pod has any .spec.schedulingGates defined
If gates exist, prevents the pod from entering the active scheduling queue
When gates are removed, the pod becomes eligible for scheduling
This is useful for coordinating pod scheduling with external systems
Use Cases:
Waiting for external resources to be provisioned
Coordinating multi-pod deployments
Integration with custom admission controllers
Example:
apiVersion: v1
kind: Pod
metadata:
  name: gated-pod
spec:
  schedulingGates:
  - name: external-resource-provisioning
  containers:
  - name: app
    image: nginx
2. PrioritySort (QueueSort Plugin)
Orders pods in the scheduling queue by priority and creation time.
Extension Points: QueueSort
How it Works:
Compares pods based on .spec.priority (higher priority first)
If priorities are equal, orders by creation timestamp (older first)
This is the only QueueSort plugin that can be enabled at a
Customization:
It can be replaced with a custom QueueSort plugin for different ordering logic.
3. NodeUnschedulable Plugin
Filters out nodes marked as unschedulable. This is one of the fastest filters, running early to eliminate unschedulable nodes.
Extension Points: Filter, EnqueueExtensions
How it Works:
Checks if node has .spec.unschedulable set to true.
If the node is marked unschedulable, the pod cannot be scheduled there
Does NOT check pod tolerations — that’s handled by the TaintToleration plugin
NodeUnschedulable respects the node’s unschedulable flag, while TaintToleration handles node taints and pod tolerations. These are two separate mechanisms.
4. NodeName Plugin
Checks if a pod’s node name matches the candidate node.
Extension Points: Filter, EnqueueExtensions
How it Works:
If .spec.nodeName is specified, only that exact node passes the filter
If not specified, all nodes pass (no filtering)
This is used when pods explicitly request a specific node
Use Cases:
DaemonSets use this to place pods on specific nodes
Manual node assignment
Testing and debugging
Example:
apiVersion: v1
kind: Pod
metadata:
  name: nginx
spec:
  nodeName: worker-node-1  # Only schedules on worker-node-1
  containers:
  - name: nginx
    image: nginx
5. TaintToleration Plugin
Filters nodes based on taints and pod tolerations.
Extension Points: Filter, PreScore, Score, EnqueueExtensions
How it Works:
Checks node taints against pod tolerations
Fails if node has untolerated taints with effect NoSchedule or NoExecute
2. Score Phase:
Gives lower scores to nodes with PreferNoSchedule taints that the pod doesn’t tolerate
Higher scores for nodes without such taints
Example:
# Node with taint
spec:
  taints:
  - key: “special-hardware”
    value: “gpu”
    effect: “NoSchedule”
---
# Pod with toleration
spec:
  tolerations:
  - key: “special-hardware”
    operator: “Equal”
    value: “gpu”
    effect: “NoSchedule”
6. NodeAffinity Plugin
Implements node affinity and node selector functionality.
Extension Points: PreFilter, Filter, PreScore, Score, EnqueueExtensions
How it Works:
Pre-computes node selector and affinity requirements
Validates affinity rules for efficiency
Stores precomputed state for use during Filter and Score
2. Filter Phase:
Evaluates requiredDuringSchedulingIgnoredDuringExecution node affinity rules
Checks .spec.nodeSelector requirements
Node must match ALL requirements to pass
3. PreScore Phase:
Prepares data structures for scoring preferred affinity rules
4. Score Phase:
Evaluates preferredDuringSchedulingIgnoredDuringExecution rules
Adds weighted scores based on matching preferred rules
More preferred rules matched = higher score
Example:
spec:
  affinity:
    nodeAffinity:
      requiredDuringSchedulingIgnoredDuringExecution:
        nodeSelectorTerms:
        - matchExpressions:
          - key: kubernetes.io/arch
            operator: In
            values: [”amd64”]
      preferredDuringSchedulingIgnoredDuringExecution:
      - weight: 50
        preference:
          matchExpressions:
          - key: node-type
            operator: In
values: [”high-performance”]Configuration:
You can add cluster-wide node affinity requirements that apply to ALL pods:
pluginConfig:
- name: NodeAffinity
  args:
    addedAffinity:
      requiredDuringSchedulingIgnoredDuringExecution:
        nodeSelectorTerms:
        - matchExpressions:
          - key: region
            operator: In
values: [”us-east”]addedAffinity: Additional node affinity applied to ALL pods on top of their own affinity requirements. Useful for cluster-wide policies (e.g., never schedule on spot instances, keep sensitive workloads in specific regions). Pods must satisfy BOTH their own affinity AND the added affinity.
Warning: This can make some pods (like DaemonSet pods with specific node assignments) unschedulable if they conflict with the added affinity
7. NodePorts Plugin
Checks if node has available ports for pod’s HostPort requirements.
Extension Points: PreFilter, Filter, EnqueueExtensions
How it Works:
Identifies all host ports requested by the pod
2. Filter Phase:
Checks if any existing pod on the node uses the same host port
Fails if port conflict exists
Port Conflicts: A pod requesting hostPort:8080 cannot be scheduled on a node that already has a pod using that port.
Example
spec:
  containers:
  - name: nginx
    image: nginx
    ports:
    - containerPort: 80
      hostPort: 8080  # Reserves port 8080 on the node
8. NodeResourcesFit Plugin
Checks if a node has sufficient resources for the pod.
Extension Points: PreFilter, Filter, PreScore, Score, EnqueueExtensions
How it Works:
Calculates total resource requests for the pod (including init containers)
Stores in CycleState for reuse
2. Filter Phase:
Compares pod requests against node available resources
Considers already-allocated resources on the node
Fails if insufficient resources
3. Score Phase:
Scores nodes based on resource allocation strategy (LeastAllocated, MostAllocated, or RequestedToCapacityRatio)
Default is LeastAllocated (prefers nodes with more available resources)
For Resource Calculation, you need to consider: 1)Sum of all container requests 2)Maximum of init container requests 3)Overhead for pod-level resources.
You can configure the scoring strategy and resource weights:
1.1. scoringStrategy.type (Scoring algorithm):
LeastAllocated (default): Prefers nodes with more available resources
Score = ((capacity - requested) / capacity) * 100MostAllocated: (Bin packing)prefers nodes with less available resources
Score = (requested / capacity) * 100RequestedToCapacityRatio: Custom function for fine-grained control
1.2. scoringStrategy.resources: List of resources to consider with their weights
2. ignoredResources: List of resource names to ignore during filtering (i.e., [“foo.example.com”])
3. ignoredResourceGroups: List of resource group prefixes to ignore (i.e., [“example.com”] ignores example.com/foo and example.com/bar)
pluginConfig:
- name: NodeResourcesFit
  args:
    scoringStrategy:
      type: LeastAllocated  # Options: LeastAllocated, MostAllocated, RequestedToCapacityRatio
      resources:
      - name: cpu
        weight: 1
      - name: memory
        weight: 1
      - name: nvidia.com/gpu
        weight: 5  # Give GPUs higher weight in scoring
    ignoredResources: []  # Optional: list of resource names to ignore during filtering
    ignoredResourceGroups: []  # Optional: list of resource group prefixes to ignore
Example with RequestedToCapacityRatio:
pluginConfig:
- name: NodeResourcesFit
  args:
    scoringStrategy:
      type: RequestedToCapacityRatio
      resources:
      - name: cpu
        weight: 2
      - name: memory
        weight: 1
      requestedToCapacityRatio:
        shape:
        - utilization: 0
          score: 0
        - utilization: 100
          score: 10  # Linear scoring function
9. NodeResourcesBalancedAllocation Plugin
Favors nodes with balanced resource utilization across CPU, memory, etc.
Why This Matters? Balanced allocation improves bin-packing efficiency and reduces resource fragmentation.
Extension Points: PreScore, Score
How it Works:
Calculates the standard deviation of resource utilization (CPU, memory, etc.)
Prefers nodes where resources are consumed at similar rates
Helps prevent scenarios like high CPU but low memory usage
Score = (1 - stdDev) * 100
# where stdDev is standard deviation of resource fractions.Example:
- Node A: 60% CPU, 20% memory → High stdDev → Low score
- Node B: 50% CPU, 50% memory → Low stdDev → High score
Configuration:
You can configure which resources to balance and their weights:
pluginConfig:
- name: NodeResourcesBalancedAllocation
  args:
    resources:
    - name: cpu
      weight: 1
    - name: memory
      weight: 1
    - name: nvidia.com/gpu
weight: 1resources: List of resources to consider for balanced allocation (default: cpu, memory). Each resource can have a weight that influences the balance calculation
10. VolumeRestrictions Plugin
Validates volume-related constraints to prevent scheduling pods with incompatible volume configurations, particularly for cloud provider volumes with specific attachment limitations.
Why This Matters?
Prevents data corruption: Ensures volumes with single-attachment semantics aren’t double-mounted
Avoids cloud provider API errors: Cloud providers reject multi-attach attempts at the infrastructure level
Enables correct scheduling: Pods with RWO volumes must be co-located on the same node or wait for the volume to be released
Extension Points: PreFilter, Filter, EnqueueExtensions
How it Works:
This plugin performs several critical checks to ensure volume compatibility and prevent conflicts:
ReadWriteOnce (RWO) Conflict Detection:
If a PVC has accessMode: ReadWriteOnce, it can only be mounted by pods on a single node
The plugin checks if the volume is already in use by a pod on a different node
Fails scheduling if attempting to schedule to a different node than the existing pod
2. Volume Type Restrictions: Different volume types have specific attachment rules.
3. Conflict Prevention Logic:
Example 1: ReadWriteOnce Conflict
# PVC with ReadWriteOnce
apiVersion: v1
kind: PersistentVolumeClaim
metadata:
  name: my-ebs-claim
spec:
  accessModes:
  - ReadWriteOnce  # Can only mount on one node
  resources:
    requests:
      storage: 10Gi
  storageClassName: ebs-sc

---
# Pod-1 already running on node-1
apiVersion: v1
kind: Pod
metadata:
  name: pod-1
spec:
  nodeName: node-1
  volumes:
  - name: data
    persistentVolumeClaim:
      claimName: my-ebs-claim  # Currently mounted on node-1

---
# Pod-2 trying to use the same volume
apiVersion: v1
kind: Pod
metadata:
  name: pod-2
spec:
  volumes:
  - name: data
    persistentVolumeClaim:
      claimName: my-ebs-claim  # FAILS: Volume is RWO and already on node-1
  # This pod can ONLY be scheduled to node-1, not node-2 or node-3
Example 2: ReadWriteMany Success
# PVC with ReadWriteMany (NFS, CephFS, etc.)
apiVersion: v1
kind: PersistentVolumeClaim
metadata:
  name: my-nfs-claim
spec:
  accessModes:
  - ReadWriteMany  # Can mount on multiple nodes
  resources:
    requests:
      storage: 10Gi
  storageClassName: nfs-sc

# Multiple pods can use this on different nodes - VolumeRestrictions allows it
Example 3: Same-Node Sharing
# Two pods can share RWO volume if scheduled on the SAME node
apiVersion: v1
kind: Pod
metadata:
  name: pod-a
spec:
  nodeName: node-1
  volumes:
  - name: shared
    persistentVolumeClaim:
      claimName: rwo-claim  # Running on node-1
---
apiVersion: v1
kind: Pod
metadata:
  name: pod-b
spec:
  volumes:
  - name: shared
    persistentVolumeClaim:
      claimName: rwo-claim  # ✓ SUCCEEDS if scheduled to node-1
# VolumeRestrictions only allows scheduling to node-1Configuration:
This plugin does not accept configuration arguments. It enforces volume restrictions based on volume types and access modes defined in PVCs and PVs.
11. VolumeBinding Plugin
Handles PersistentVolumeClaim binding and validation.
Extension Points: PreFilter, Filter, Reserve, PreBind, EnqueueExtensions
How it Works:
Checks if required PVCs can be satisfied on the node
Considers volume topology (zone/region requirements)
Validates storage class availability
2. Reserve Phase:
Reserves PVs for the pod’s PVCs (in-memory, not API)
3. PreBind Phase:
Actually binds PVCs to PVs by updating the API server
Configuration:
You can configure the volume binding timeout and storage capacity scoring:
pluginConfig:
- name: VolumeBinding
  args:
    bindTimeoutSeconds: 600  # Wait up to 10 minutes for volume binding
    shape:  # Optional: storage capacity-aware scoring (uses CSIStorageCapacity)
    - utilization: 0
      score: 10   # Prefer nodes with more available storage capacity
    - utilization: 100
score: 0 # Avoid nodes with nearly full storagebindTimeoutSeconds: Maximum time to wait for volume binding operations (default: 600 seconds)
shape: Score function shape for storage capacity-aware scoring. Useful for bin-packing storage or spreading volumes across nodes with available capacity.
12. VolumeZone Plugin
Ensures pods are scheduled in zones where their volumes exist.
Extension Points: PreFilter, Filter, EnqueueExtensions
How it Works:
Checks volume zone requirements from PVs
Filters out nodes in zones that don’t match volume locations
Critical for multi-zone clusters with zone-specific storage
Example:
# Pod with this PVC can only schedule in us-east-1a
topology.kubernetes.io/zone: us-east-1a
13. NodeVolumeLimits (CSI) Plugin
Ensures node volume attachment limits aren’t exceeded. Each cloud provider and node type has specific limits on attached volumes.
Extension Points: PreFilter, Filter, EnqueueExtensions
How it Works:
Checks CSI driver volume attachment limits
Different limits for different volume types
14. InterPodAffinity Plugin
Implements pod-to-pod affinity and anti-affinity rules. This is one of the most expensive plugins as it needs to check pod-to-pod relationships across the cluster.
Extension Points: PreFilter, Filter, PreScore, Score, EnqueueExtensions
How it Works:
Evaluates requiredDuringSchedulingIgnoredDuringExecution affinity/anti-affinity
Checks topology domains (i.e., same zone, same node)
Must satisfy all required rules
2. Score Phase:
Evaluates preferredDuringSchedulingIgnoredDuringExecution rules
Adds weighted scores for matching preferred rules
Example:
# Anti-affinity to spread replicas across nodes
spec:
  affinity:
    podAntiAffinity:
      requiredDuringSchedulingIgnoredDuringExecution:
      - labelSelector:
          matchLabels:
            app: myapp
topologyKey: kubernetes.io/hostnameConfiguration:
You can configure affinity processing behavior:
pluginConfig:
- name: InterPodAffinity
  args:
    hardPodAffinityWeight: 1  # Weight for required affinity rules in scoring (legacy)
ignorePreferredTermsOfExistingPods: false # Consider existing pods’ preferenceshardPodAffinityWeight: Weight applied to hard pod affinity rules in scoring (default: 1). Note: This is mostly a legacy parameter; modern clusters use scoring plugins directly.
ignorePreferredTermsOfExistingPods: If true, ignore existing pods’ preferred affinity rules when scoring nodes (default: false). Set to true for better performance when you only care about the incoming pod’s affinity, not existing pods’ preferences. The incoming pod’s inter-pod affinities are always evaluated
15. PodTopologySpread Plugin
Spreads pods across topology domains (zones, nodes, custom domains) according to constraints. The cluster often has default topology spread constraints for zone-level spreading.
Extension Points: PreFilter, Filter, PreScore, Score, EnqueueExtensions
How it Works:
Evaluates whenUnsatisfiable: DoNotSchedule constraints
Calculates current spread across topology domains
Fails if placing pod would violate maxSkew
2. Score Phase:
Evaluates whenUnsatisfiable: ScheduleAnyway constraints
Prefers placements that improve spread balance
Example:
spec:
  topologySpreadConstraints:
  - maxSkew: 1
    topologyKey: kubernetes.io/hostname
    whenUnsatisfiable: DoNotSchedule
    labelSelector:
      matchLabels:
app: myappConfiguration:
You can configure cluster-wide default topology spread constraints:
pluginConfig:
- name: PodTopologySpread
  args:
    defaultConstraints:
    - maxSkew: 1
      topologyKey: kubernetes.io/hostname
      whenUnsatisfiable: ScheduleAnyway
    - maxSkew: 3
      topologyKey: topology.kubernetes.io/zone
      whenUnsatisfiable: ScheduleAnyway
defaultingType: List # Options: System, ListdefaultConstraints: Default spread constraints applied to all pods (unless pod specifies its own)
defaultingType: How defaults are applied. System uses system-defined defaults, List uses the constraints defined in defaultConstraints
16. ImageLocality Plugin
Favors nodes that already have the pod’s container images.
Why This Matters? Image pulling can take significant time (especially for large images), so scheduling on nodes with cached images improves pod startup time.
Extension Points: Score
How it Works:
Checks which nodes have the required images already pulled
Gives higher scores to nodes with images present
Considers image sizes in scoring (larger images = bigger boost)
Score = sum(image sizes already on node) / sum(all image sizes)17. DynamicResources Plugin
Handles Dynamic Resource Allocation (DRA) for devices like GPUs, FPGAs.
Extension Points: PreEnqueue, PreFilter, Filter, PostFilter, Reserve, PreBind, EnqueueExtensions.
Score and Unreserve extension points will be introduced in v1.35.
How it Works:
PreEnqueue Phase:
Checks if ResourceClaims are ready before pod enters scheduling queue
Prevents scheduling attempts when required claims don’t exist or aren’t ready
2. PreFilter Phase:
Identifies and validates ResourceClaims required by the pod
Pre-computes claim allocation requirements
3. Filter Phase:
Checks if nodes can satisfy the pod’s ResourceClaim requirements
Evaluates device availability and compatibility with each node
Searches through ResourceSlices for allocatable devices
4. PostFilter Phase:
- Participates in preemption to free up dynamic resources if needed
5. Reserve Phase:
Reserves dynamic resources (devices) for the pod on the selected node
6. PreBind Phase:
Finalizes ResourceClaim allocations by updating claim statuses
Coordinates with DRA drivers for device provisioning
Use Cases:
GPU scheduling with ResourceClaims
FPGA and other accelerator allocation
Custom hardware resource management via DRA API
Configuration:
You can configure the filter timeout for resource allocation:
pluginConfig:
- name: DynamicResources
  args:
filterTimeout: 10s # Maximum time to search for allocatable devices per nodefilterTimeout: Maximum time allowed for the filter operation per node to find devices that can be allocated (default: 10 seconds)
The plugin searches through ResourceSlices and evaluates CEL expressions for device matching. In typical scenarios, this takes 10–200ms, but could be longer with many ResourceClaims or complex requests.
If timeout is reached, the pod is considered unschedulable for that node. Set to 0 to completely disable the timeout (not recommended). You can reduce this after checking scheduler_plugin_execution_duration_seconds metrics.
Slow DRA filtering can impact scheduling performance for all pods, not just those using DRA.
BindingTimeout is going to be introduced in v1.35
18. DefaultPreemption Plugin
Handles pod preemption when no nodes are available.
Extension Points: PreEnqueue, PostFilter
How it Works:
PreEnqueue Phase:
Checks if the pod can potentially preempt other pods
May block pods from entering the active scheduling queue if preemption conditions aren’t met
Evaluates preemption feasibility before expensive scheduling attempts
2. PostFilter Phase:
The DefaultPreemption plugin implements a multi-phase algorithm to select the optimal victims for preemption when all filters have failed. The goal is to preempt the minimum number of pods with the least impact while respecting PodDisruptionBudgets.
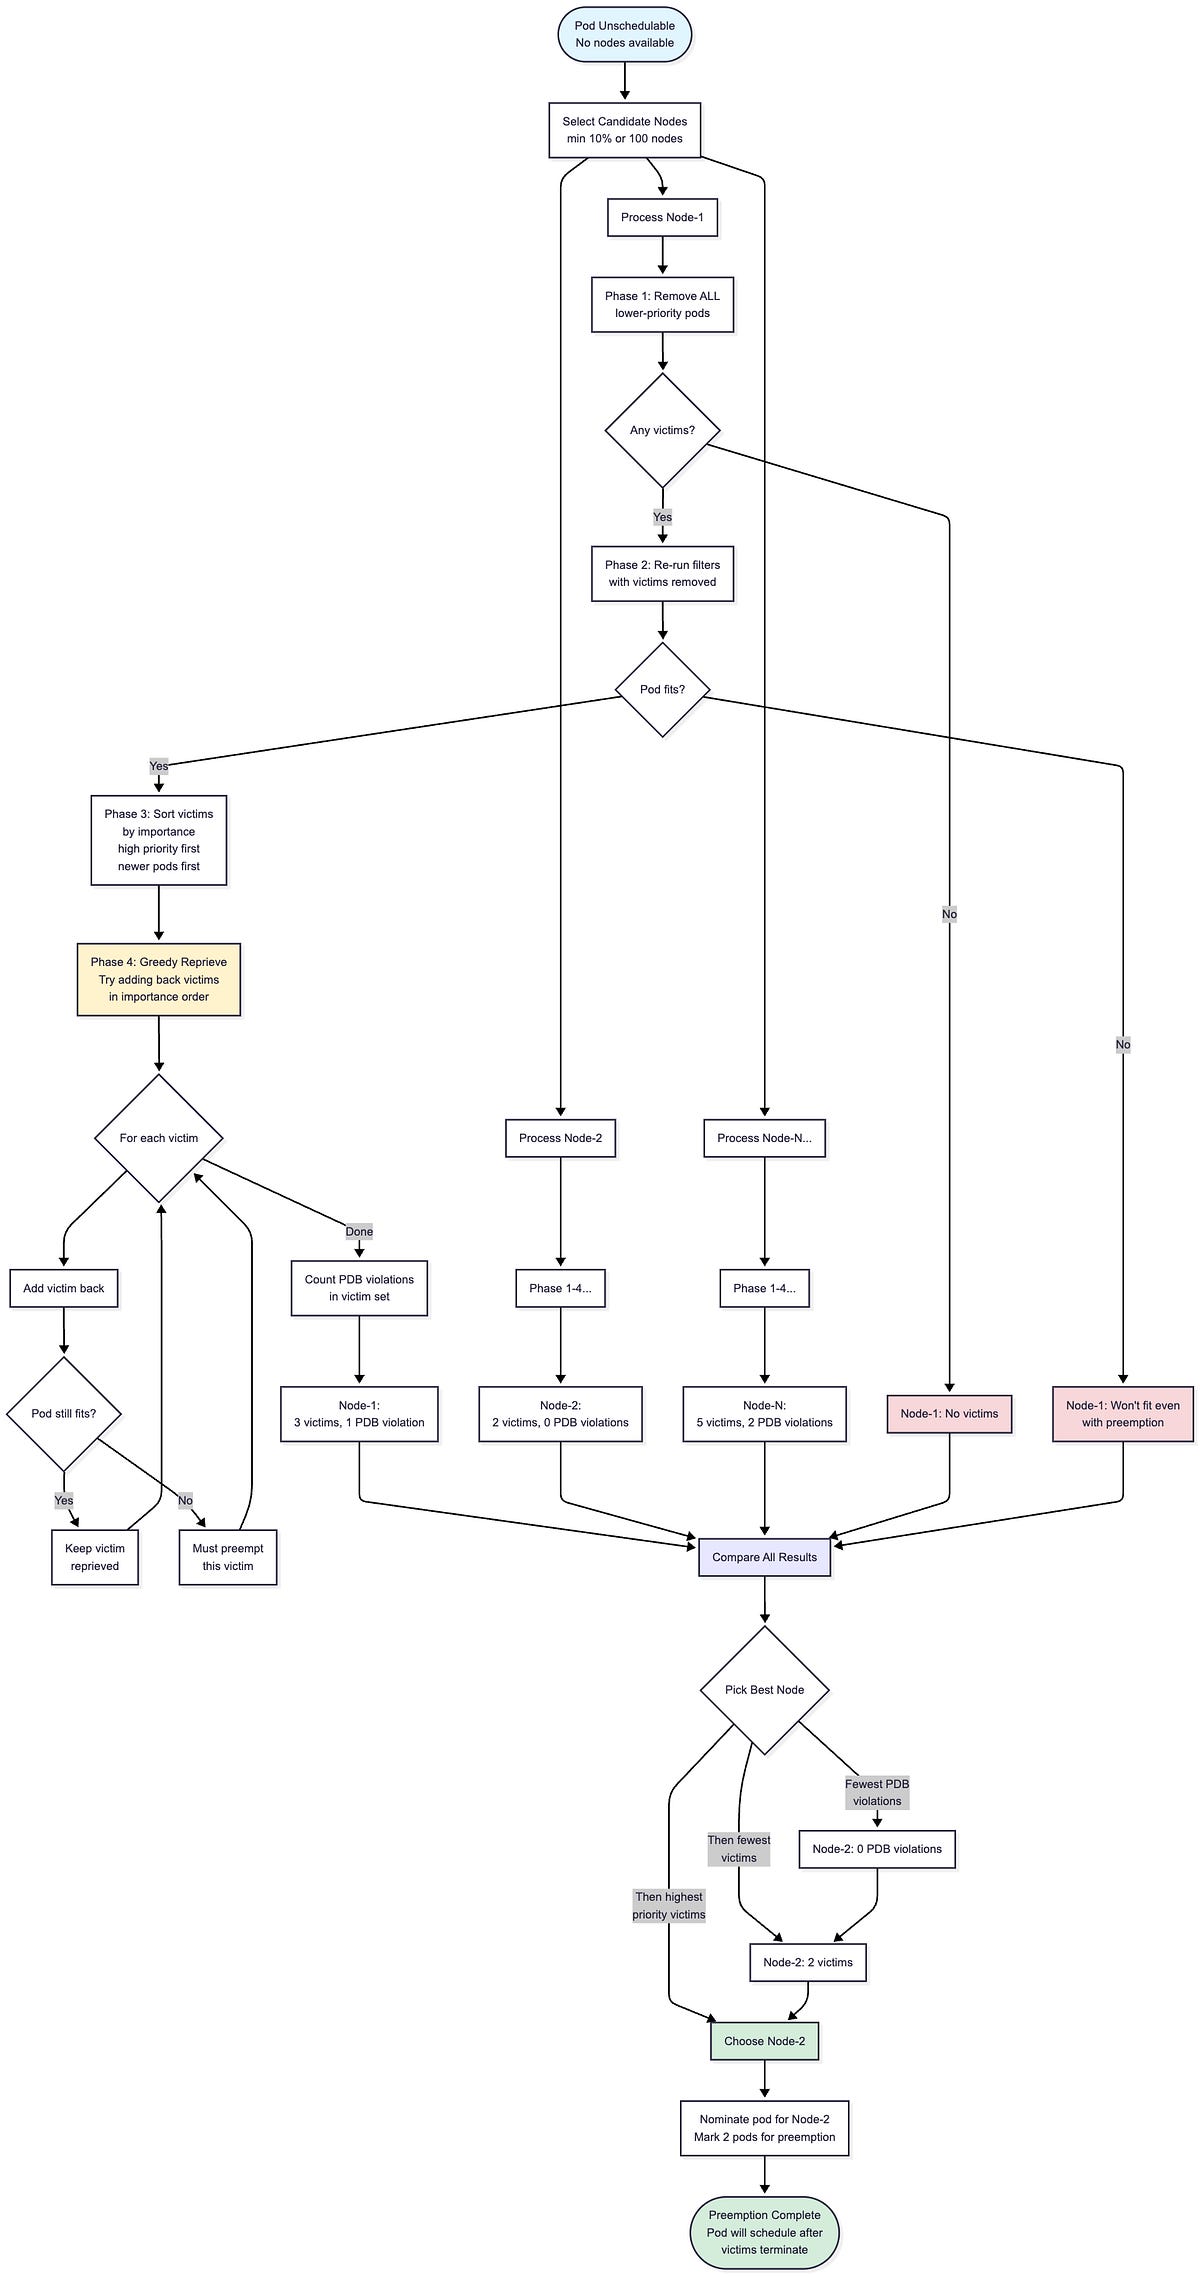
The diagram above shows the complete preemption workflow.
The scheduler first selects a subset of candidate nodes (at least 10% or 100 nodes, whichever is larger) and runs the victim selection algorithm on each in parallel.
For each candidate node, the algorithm goes through four phases to determine the minimal set of pods to preempt.
After evaluating all candidates, the scheduler compares the results and picks the best node, prioritizing nodes with fewer PDB violations, then fewer victims, then victims with higher priority.
The pod is then nominated for that node and marked to schedule once the selected victims terminate.
Below is the detailed implementation of the victim selection algorithm that runs on each candidate node.
The preemption algorithm operates in multiple phases on each candidate node:
func (pl *DefaultPreemption) SelectVictimsOnNode(
    ctx context.Context,
    state fwk.CycleState,
    pod *v1.Pod,
    nodeInfo fwk.NodeInfo,
    pdbs []*policy.PodDisruptionBudget) ([]*v1.Pod, int, *fwk.Status) {

    var potentialVictims []fwk.PodInfo

    // Phase 1: Remove ALL eligible lower-priority victims
    for _, pi := range nodeInfo.GetPods() {
        if pod.Spec.Priority > pi.GetPod().Spec.Priority {
            potentialVictims = append(potentialVictims, pi)
            removePod(pi)  // Temporarily remove from node state
        }
    }

    if len(potentialVictims) == 0 {
        return nil, 0, fwk.NewStatus(fwk.UnschedulableAndUnresolvable,
            “No preemption victims found”)
    }

    // Phase 2: Re-run filters to see if preemptor can fit
    status := pl.fh.RunFilterPluginsWithNominatedPods(ctx, state, pod, nodeInfo)
    if !status.IsSuccess() {
        return nil, 0, status  // Even with all victims removed, pod won’t fit
    }

    // Phase 3: Sort potential victims by importance (high to low)
    // Higher importance = should be reprieved first
    sort.Slice(potentialVictims, func(i, j int) bool {
        return moreImportant(potentialVictims[i], potentialVictims[j])
    })

    // Phase 4: Greedily try to add victims back
    // Keep victims that can coexist with the preemptor
    var finalVictims []fwk.PodInfo

    for _, victim := range potentialVictims {
        addPod(victim)  // Tentatively add back
        status := pl.fh.RunFilterPluginsWithNominatedPods(ctx, state, pod, nodeInfo)
        if status.IsSuccess() {
            // Preemptor still fits with this victim present - reprieve it
            continue
        } else {
            // Preemptor won’t fit - must preempt this victim
            removePod(victim)
            finalVictims = append(finalVictims, victim)
        }
    }

    // Count how many PDB violations the final victim set causes
    numPDBViolations := countPDBViolations(finalVictims, pdbs)

    return finalVictims, numPDBViolations, fwk.NewStatus(fwk.Success)
}
How the Algorithm Works:
1. Phase 1 (Remove All Lower-Priority Pods): Remove all pods with lower priority than the preemptor. This establishes the maximum possible set of victims.
2. Phase 2 (Verify Feasibility): Re-run all filter plugins to check if the preemptor can actually fit on this node with all lower-priority pods removed. If filters still fail (i.e., due to node selector, taints, or other hard constraints), preemption won’t help on this node.
3. Phase 3 (Sort by Importance): Sort potential victims by importance. Higher-priority pods are more important; among equal-priority pods, newer pods are more important. This ordering determines which pods the algorithm tries to save (reprieve) first.
4. Phase 4 (Greedy Reprieve): Iterate through victims in importance order. For each victim, try adding it back and re-running filters. If the preemptor still fits, keep that victim (reprieve it). If the preemptor no longer fits, that victim must be preempted.
func moreImportant(pod1, pod2 *v1.Pod) bool {
    // Higher priority = more important
    p1 := corev1helpers.PodPriority(pod1)
    p2 := corev1helpers.PodPriority(pod2)
    if p1 != p2 {
        return p1 > p2
    }

    // Same priority: newer pods are more important
    return pod1.CreationTimestamp.After(pod2.CreationTimestamp.Time)
}
PodDisruptionBudget Handling:
The algorithm filters pods with PDB violations that would result from the selected victims.
When comparing multiple candidate nodes for preemption, the scheduler prefers nodes that result in fewer PDB violations. The scheduler minimizes PDB violations but does not guarantee zero violations, if preemption is necessary and all candidates would violate PDBs, the scheduler proceeds with the node that has the fewest violations.
Here is an example for a preemption scenario:
Node has pods: A(priority=100), B(priority=50), C(priority=50), D(priority=10)
Preemptor has priority=80 and needs 2 CPU

Phase 1: Remove B, C, D (all have lower priority than 80)
Phase 2: Re-run filters with B, C, D removed → Preemptor fits ✓
Phase 3: Sort victims by importance → [B, C, D]
         (B and C have priority=50, D has priority=10)
         (Assume B is newer than C, so order is B > C > D)
Phase 4: Greedy reprieve
  - Try adding B back → Re-run filters → Preemptor still fits → Keep B (reprieved)
  - Try adding C back → Re-run filters → Preemptor still fits → Keep C (reprieved)
  - Try adding D back → Re-run filters → Preemptor no longer fits → Must preempt D

Result: Only D is preempted (minimal victim set)
Preemption Policy:
The preemptor pod can opt out of preempting other pods using preemptionPolicy:
apiVersion: v1
kind: Pod
metadata:
  name: best-effort-pod
spec:
  preemptionPolicy: Never  # This pod will not preempt others
  priority: 1000
  containers:
  - name: app
    image: myapp
When preemptionPolicy: Never is set, the pod will remain unschedulable rather than preempting lower-priority pods. This is useful for best-effort workloads that should wait for resources naturally rather than disrupting existing workloads.
The default value is PreemptLowerPriority, which allows the pod to preempt lower-priority pods as described above.
Configuration:
You can configure how many candidate nodes are evaluated during preemption:
pluginConfig:
- name: DefaultPreemption
  args:
    minCandidateNodesPercentage: 10  # Evaluate at least 10% of nodes
minCandidateNodesAbsolute: 100 # Evaluate at least 100 nodesminCandidateNodesPercentage: Minimum percentage of nodes to evaluate for preemption (default: 10)
minCandidateNodesAbsolute: Minimum absolute number of nodes to evaluate (default: 100)
The larger of these two values is used to determine candidate nodes for preemption.
19. DefaultBinder Plugin
Performs the actual binding of pod to node. This plugin can be replaced with custom bind plugins for special binding logic.
Extension Points: Bind
How it Works:
Creates a Binding object and sends it to the API server
Updates the pod’s .spec.nodeName field
This is the final step in the scheduling process
Default Plugin Configuration
In Kubernetes 1.34, MultiPoint is the only default configuration block for plugins. All 19 in-tree plugins are enabled through MultiPoint, and all other extension points (PreEnqueue, QueueSort, PreFilter, Filter, PostFilter, PreScore, Score, Reserve, PreBind, Bind, etc.) are automatically inferred from the plugins’ implementations:
plugins:
  multiPoint:
    enabled:
    - name: PrioritySort
    - name: NodeUnschedulable
    - name: NodeName
    - name: TaintToleration
      weight: 3
    - name: NodeAffinity
      weight: 2
    - name: NodePorts
    - name: NodeResourcesFit
      weight: 1
    - name: VolumeRestrictions
    - name: NodeVolumeLimits
    - name: VolumeBinding
    - name: VolumeZone
    - name: PodTopologySpread
      weight: 2
    - name: InterPodAffinity
      weight: 2
    - name: DefaultPreemption
    - name: NodeResourcesBalancedAllocation
      weight: 1
    - name: ImageLocality
      weight: 1
    - name: DefaultBinder
    - name: SchedulingGates
    - name: DynamicResources
Extension Point Auto-Population: Each plugin in MultiPoint is automatically registered at the extension points it implements. For example:
PreEnqueue is auto-populated with: SchedulingGates, DynamicResources, DefaultPreemption
QueueSort is auto-populated with: PrioritySort
Reserve is auto-populated with: VolumeBinding, DynamicResources
Bind is auto-populated with: DefaultBinder
You never need to explicitly configure these extension points unless you want to override the defaults. The framework handles the registration automatically based on each plugin’s implementation.
The weights determine the relative importance of each scoring plugin. The final node score is a weighted sum of all score plugin results.
In-Tree Plugins Execution Sequence
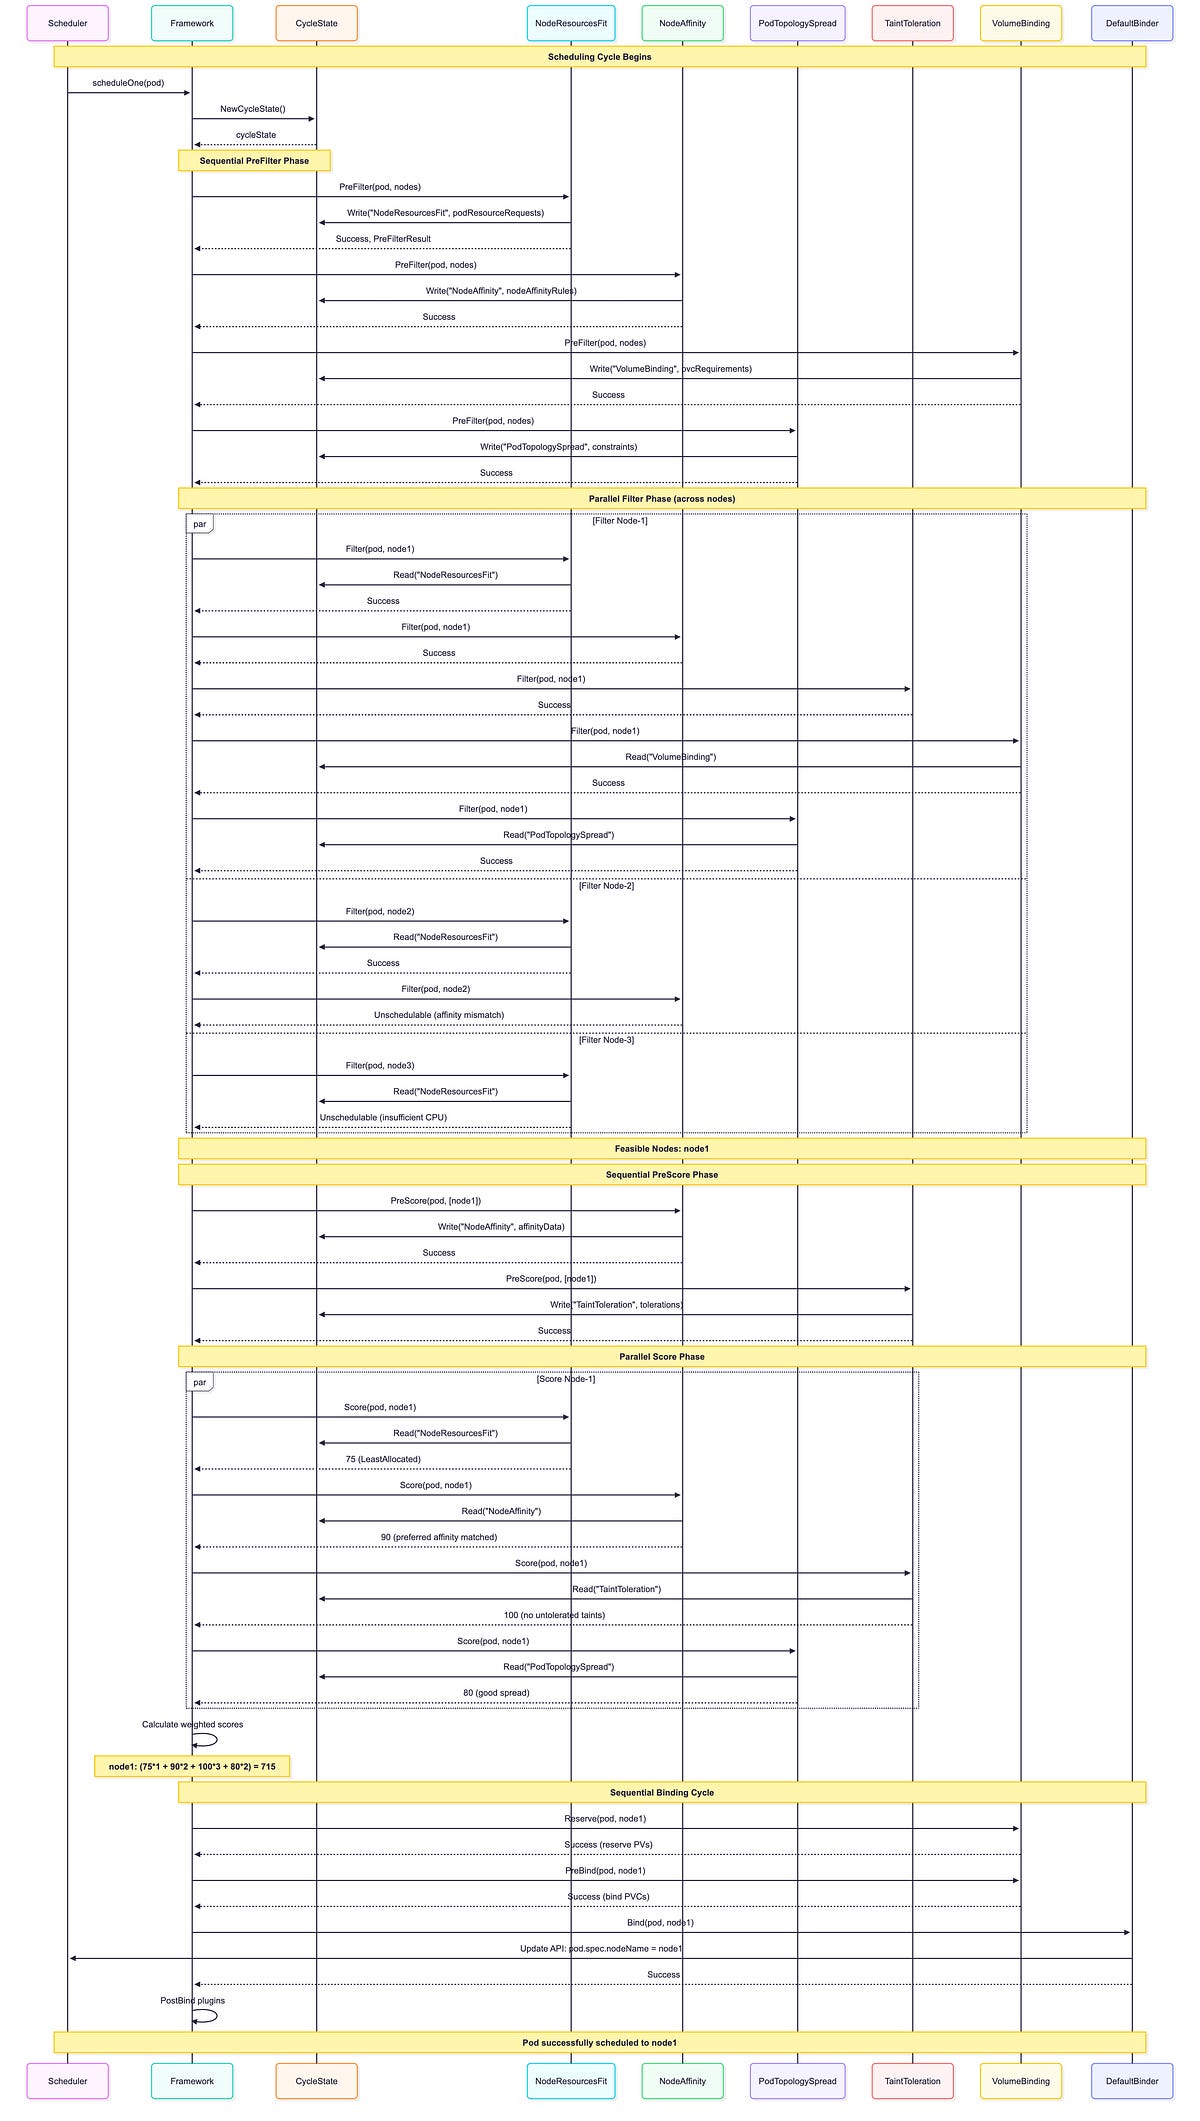
Key observations from this sequence:
Multiple Plugins Per Extension Point: Notice how NRF(NodeResourceFit), NA(NodeAffinity), TT(TaintToleration), VB(VolumeBinding), and PTS(PodTopologySpread) ALL execute during the Filter phase for each node. Similarly, NRF, NA, TT, and PTS all run during the Score phase. The scheduler doesn’t pick one plugin, it runs ALL enabled plugins for each extension point.
CycleState Usage: PreFilter plugins write data once (NRF writes resource requests, NA writes affinity data, VB writes PVC requirements, PTS writes constraints), then Filter/Score plugins read this precomputed state multiple times, avoiding redundant calculations.
Parallel Execution: Filter and Score run concurrently across multiple nodes for better performance. Each node is evaluated independently by all filter plugins.
Sequential Phases: PreFilter, Reserve, PreBind, Bind execute in strict sequential order. These phases run once per scheduling attempt, not per node.
Early Termination: Node-2 fails NA. Filter (affinity mismatch), node-3 fails NRF.Filter (insufficient CPU). A node is eliminated if ANY filter plugin rejects it.
Weighted Scoring: Final score combines ALL scoring plugin results with their configured weights: (75×1 + 90×2 + 100×3 + 80×2) = 715. Higher weights give plugins more influence on the final decision.
Plugin Ordering: Plugins execute in their configured order within each phase. This can matter for early-exit optimizations in the Filter phase.
Binding Cycle: VolumeBinding participates in Reserve (to reserve PVs) and PreBind (to bind PVCs) before DefaultBinder updates the pod’s nodeName. DynamicResources would similarly participate if the pod used ResourceClaims.
Scheduler Configuration Examples
Now that we’ve covered all 19 in-tree plugins, let’s look at the most impactful configuration use cases that deliver real business value. These examples address common production challenges with minimal complexity.
1. Cost Optimization with Resource Strategies
Configure NodeResourcesFit with a bin-packing strategy using RequestedToCapacityRatio to address wasted resources and poor node utilization. This custom shape function awards the highest score (10) to nodes at 60–80% utilization, avoiding both underutilized and fully saturated nodes. Combined with NodeResourcesBalancedAllocation to prevent resource imbalances, this configuration can reduce cloud costs by 20–40% when used with cluster autoscaler. The approach works particularly well for stateless workloads, batch processing, and dev/staging clusters where cost optimization is prioritized over perfect availability.
apiVersion: kubescheduler.config.k8s.io/v1
kind: KubeSchedulerConfiguration
profiles:
- schedulerName: default-scheduler
  pluginConfig:
  - name: NodeResourcesFit
    args:
      scoringStrategy:
        type: RequestedToCapacityRatio
        resources:
        - name: cpu
          weight: 2
        - name: memory
          weight: 1
        requestedToCapacityRatio:
          shape:
          - utilization: 0
            score: 0      # Empty nodes get zero score
          - utilization: 60
            score: 8      # Sweet spot begins
          - utilization: 80
            score: 10     # Optimal utilization
          - utilization: 100
            score: 0      # Avoid fully packed nodes
  - name: NodeResourcesBalancedAllocation
    args:
      resources:
      - name: cpu
        weight: 1
      - name: memory
        weight: 1
  plugins:
    multiPoint:
      enabled:
      - name: NodeResourcesFit
        weight: 3
      - name: NodeResourcesBalancedAllocation
        weight: 2
2. High Availability with Topology Spread
Configure default topology spread constraints to prevent pod replicas from concentrating on few nodes or zones, which creates single points of failure. This configuration ensures zone-level distribution (maxSkew: 1, hard requirement) and encourages node-level spread (maxSkew: 2, soft preference), preventing catastrophic failures during zone or node outages. Essential for production clusters with SLA requirements, this setup ensures no zone has more than 1 extra replica compared to others. Best suited for multi-zone deployments with stateless applications running multiple replicas.
apiVersion: kubescheduler.config.k8s.io/v1
kind: KubeSchedulerConfiguration
profiles:
- schedulerName: default-scheduler
  pluginConfig:
  - name: PodTopologySpread
    args:
      defaultConstraints:
      - maxSkew: 1
        topologyKey: topology.kubernetes.io/zone
        whenUnsatisfiable: DoNotSchedule  # Hard requirement for zone spread
        labelSelector: {}
        matchLabelKeys:
        - app
      - maxSkew: 2
        topologyKey: kubernetes.io/hostname
        whenUnsatisfiable: ScheduleAnyway  # Soft preference for node spread
        labelSelector: {}
        matchLabelKeys:
        - app
      defaultingType: List
3. Compliance and Data Locality
Apply cluster-wide node affinity to enforce regulatory requirements such as GDPR data residency or prevent critical workloads from running on spot instances. The addedAffinity configuration adds requirements to all pods automatically, ensuring compliance without requiring every team to configure affinity rules individually. This prevents expensive compliance violations and unexpected workload evictions from spot instance terminations. Particularly valuable for regulated industries, multi-region clusters, and infrastructure mixing spot and on-demand instances.
apiVersion: kubescheduler.config.k8s.io/v1
kind: KubeSchedulerConfiguration
profiles:
- schedulerName: default-scheduler
  pluginConfig:
  - name: NodeAffinity
    args:
      addedAffinity:
        requiredDuringSchedulingIgnoredDuringExecution:
          nodeSelectorTerms:
          - matchExpressions:
            - key: topology.kubernetes.io/region
              operator: In
              values: [”eu-west-1”]  # GDPR compliance
            - key: node-lifecycle
              operator: NotIn
              values: [”spot”]  # Critical workloads avoid spot instances
4. Node Pool Segmentation with Taints and Tolerations
Segment your cluster into specialized node pools using TaintToleration with increased weight to strongly influence scheduling decisions. By increasing the TaintToleration weight to 3 (from default 1), the scheduler prioritizes matching pods to their designated node pools based on taints and tolerations, which is essential for multi-tenant clusters, GPU/CPU pool separation, or spot/on-demand segmentation. This ensures workloads land on appropriately configured nodes (i.e., GPU pods on GPU nodes, batch workloads on spot instances) without requiring complex node selectors on every pod. Particularly valuable when combined with node taints like workload-type=gpu:NoSchedule or lifecycle=spot:PreferNoSchedule.
apiVersion: kubescheduler.config.k8s.io/v1
kind: KubeSchedulerConfiguration
profiles:
- schedulerName: default-scheduler
  plugins:
    multiPoint:
      enabled:
      - name: TaintToleration
        weight: 3  # Strongly prefer taint/toleration matches
      - name: NodeAffinity
        weight: 2
      - name: NodeResourcesFit
        weight: 1
5. Performance Optimization with Plugin Weights
Adjust plugin weights to align scheduler decisions with your specific workload priorities when defaults don’t match your needs. In this example, NodeResourcesFit receives weight 5 to strongly prefer nodes with available resources, ImageLocality gets weight 3 for faster pod startup by prioritizing nodes with cached images, while PodTopologySpread drops to weight 1 since perfect distribution is less critical than performance. This customization can significantly improve metrics that matter most to your business, such as reducing pod startup time in latency-sensitive applications or maximizing throughput in batch processing clusters.
apiVersion: kubescheduler.config.k8s.io/v1
kind: KubeSchedulerConfiguration
profiles:
- schedulerName: default-scheduler
  plugins:
    multiPoint:
      enabled:
      - name: PrioritySort
      - name: NodeUnschedulable
      - name: NodeName
      - name: TaintToleration
        weight: 3
      - name: NodeAffinity
        weight: 2
      - name: NodePorts
      - name: NodeResourcesFit
        weight: 5  # Strongly prefer nodes with available resources
      - name: VolumeRestrictions
      - name: NodeVolumeLimits
      - name: VolumeBinding
      - name: VolumeZone
      - name: PodTopologySpread
        weight: 1  # De-prioritize spread for this cluster
      - name: InterPodAffinity
        weight: 2
      - name: DefaultPreemption
      - name: NodeResourcesBalancedAllocation
        weight: 1
      - name: ImageLocality
        weight: 3  # Fast pod startup is important
      - name: DefaultBinder
      - name: DynamicResources
6. GPU/AI Workloads with Dynamic Resource Allocation
Optimize GPU scheduling for ML/AI workloads by combining custom scoring with Dynamic Resource Allocation (DRA) support. The RequestedToCapacityRatio strategy with a GPU weight of 6 prefers nodes with 50–80% GPU utilization, avoiding both underutilized and saturated GPU nodes. DRA filterTimeout of 5 seconds allows efficient device matching for ResourceClaims, while preemption settings ensure high-priority training jobs can preempt lower-priority workloads. This configuration maximizes ROI on expensive GPU hardware (10x+ cost of regular compute) and is essential for ML/AI clusters, rendering farms, or any environment with specialized accelerators.
apiVersion: kubescheduler.config.k8s.io/v1
kind: KubeSchedulerConfiguration
profiles:
- schedulerName: default-scheduler
  pluginConfig:
  - name: NodeResourcesFit
    args:
      scoringStrategy:
        type: RequestedToCapacityRatio
        resources:
        - name: cpu
          weight: 1
        - name: memory
          weight: 1
        - name: nvidia.com/gpu
          weight: 6  # GPUs are expensive - weight them heavily
        requestedToCapacityRatio:
          shape:
          - utilization: 0
            score: 0      # Avoid empty GPU nodes
          - utilization: 50
            score: 5      # Start scoring
          - utilization: 80
            score: 10     # Optimal GPU utilization
          - utilization: 100
            score: 0      # Avoid fully saturated GPUs
  - name: DynamicResources
    args:
      filterTimeout: 5s  # Fast device matching for ResourceClaims
  - name: DefaultPreemption
    args:
      minCandidateNodesPercentage: 10
      minCandidateNodesAbsolute: 100
7. Large Cluster Preemption Performance
Reduce preemption candidate evaluation in large clusters to speed up scheduling for high-priority pods. By lowering the percentage from the default 10% to 5% (with a minimum of 50 nodes), a 2000-node cluster evaluates only 100 nodes instead of 200, cutting preemption time by roughly 50% while still finding good preemption candidates. This optimization is particularly valuable for clusters with 1000+ nodes, environments with frequent preemption activity, or any latency-sensitive scheduling scenario where fast preemption decisions are critical.
apiVersion: kubescheduler.config.k8s.io/v1
kind: KubeSchedulerConfiguration
profiles:
- schedulerName: default-scheduler
  pluginConfig:
  - name: DefaultPreemption
    args:
      minCandidateNodesPercentage: 5   # Evaluate only 5% instead of default 10%
      minCandidateNodesAbsolute: 50    # Or minimum 50 nodes
8. Storage-Heavy Stateful Workload Optimization
Optimize volume binding for stateful workloads by extending timeout and enabling storage capacity-aware scoring. The 15-minute timeout (900 seconds) accommodates slow on-premise NFS systems and rate-limited cloud APIs. The storage capacity scoring shape prefers nodes with more available storage capacity (utilization 0 = score 10), avoiding nearly full nodes (utilization 100 = score 0), which prevents storage exhaustion and distributes volumes across nodes with available capacity. This leverages CSIStorageCapacity objects from CSI drivers to make topology-aware placement decisions. Critical for stateful applications with heavy storage requirements, database clusters, or any environment where storage capacity management and PVC provisioning delays are concerns.
apiVersion: kubescheduler.config.k8s.io/v1
kind: KubeSchedulerConfiguration
profiles:
- schedulerName: default-scheduler
  pluginConfig:
  - name: VolumeBinding
    args:
      bindTimeoutSeconds: 900  # 15 minutes for slow storage backends
      shape:  # Storage capacity-aware scoring (uses CSIStorageCapacity)
      - utilization: 0
        score: 10   # Prefer nodes with more available storage capacity
      - utilization: 80
        score: 5    # Medium score for mostly utilized capacity
      - utilization: 100
        score: 0    # Avoid nodes with nearly exhausted storage capacity
9. Performance vs. Precision Trade-off
Optimize InterPodAffinity evaluation in dense clusters by ignoring existing pods’ preferred affinity terms during scoring, trading some precision for significant performance gains. This configuration can improve scheduling throughput by 2–3x in clusters with 10,000+ pods and complex affinity rules, while still fully evaluating the incoming pod’s own affinity requirements. Best suited for dense clusters with high pod churn rates where scheduling speed is more critical than considering every existing pod’s preferred affinity, particularly when most pods use hard requirements rather than soft preferences.
apiVersion: kubescheduler.config.k8s.io/v1
kind: KubeSchedulerConfiguration
profiles:
- schedulerName: default-scheduler
  pluginConfig:
  - name: InterPodAffinity
    args:
      hardPodAffinityWeight: 1
      ignorePreferredTermsOfExistingPods: true  # Performance over precision
In the next blog, we will cover the scheduler cycle state, scheduler queues, scheduler cache, and api dispatcher.
Additional Resources
Official Kubernetes Documentation: https://kubernetes.io/docs/concepts/scheduling-eviction/kube-scheduler
Scheduler Source Code: Production-Grade Container Scheduling and Management - kubernetes/pkg/scheduler/framework/plugins at master ·…github.com